Make cake, not war

img_8636

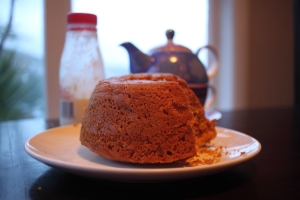
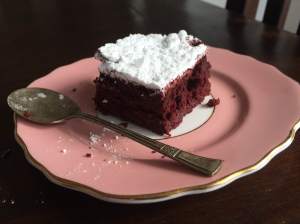
Happy 2017 everyone!  I think we can all agree that the year we have just ushered out was rather bruising, whether you’re talking politically, artistically, or for many of us, personally.  So, what we really need to ring in the New Year is not cucumber sticks, lycra, mineral water or resolutions. No, what is called for is a big, comforting, chocolatey cake.  Or at least that is how I felt today in amongst reading, watching Netflix and snoozing on the sofa with our cats.

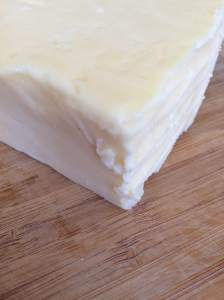
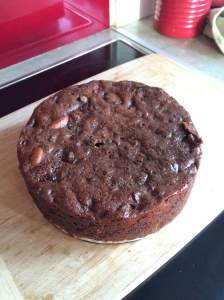
I’m not going to pretend I was feeling sparky enough to whip up my own recipe.  And why would I need to, when I’m lucky enough to have my very own copy of Alice Arndell‘s Alice in Bakingland?  This recipe, sweetly titled ‘Nanny’s chocolate cake’ is a winner, delivering a pleasingly chocolatey cake every time.  Because I really felt the need to up the nourishment factor on this one, I slathered jam and cream on cut halves before sandwiching the cake back together and topping it with a generous serving of chocolate icing.

Take care everyone and I’m hoping this cake sets the tone for a much sweeter, kinder year.

Nanny’s chocolate cake by Alice Arndell

Ingredients:

  • 170g butter
  • 1/4 cup golden syrup
  • 2 cups plain flour
  • 2/3 cups cocoa
  • 1 cup brown sugar
  • 3 tsp baking powder
  • 2 tsp baking soda
  • 2 tsp intant coffee granules
  • 2 eggs
  • 2 tsp vanilla essence
  • 1/4 t salt
  • 1 & 1/2 cups milk

Method:

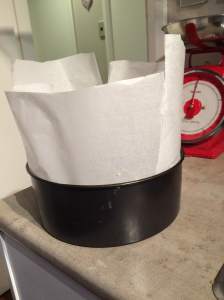
Pre-heat the oven to 170 degrees celsius.  Grease and line a 23cm cake tin.

Place the butter and golden syrup in a microwave-proof bowl and heat on high until the butter is melted – this is 1 minute 10 seconds in my microwave.  Stir to combine and set aside.

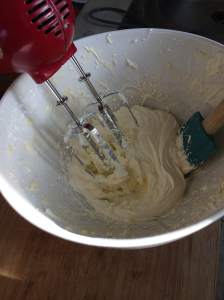
Place all other ingredients in a large bowl and beat for 5 minutes.  The original recipe calls for a stand mixer, which I don’t have, so I find a handheld electric beater works well.  You may need to beat for a little longer if you do this by hand.

Pour in the butter and syrup and mix through.

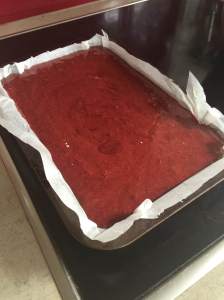
This mixture is runny so don’t worry!  Pour it into the prepared tin and bake for 50-60 minutes until a skewer inserted into the middle of the cake comes out clean with a few crumbs.

Cool in the tin for 10 minutes then turn out onto a wire rack to cool completely.


Russian fudge

img_8165

If you fancy a sugar hangover, look no further.  This fudge is mouth-suckingly sweet and all the better for it.  A firm Kiwi favourite, it is dense and rich, comprised largely of sugar, sweetened condensed milk and golden syrup.

I can’t get to the bottom of its name.  In my travels through the internet, I was delighted to find Nigella acknowledges we call Russian Fudge in our little country, although she calls her version Vanilla Fudge.

This lovely Polish-authored food blog includes a recipe for Polish krówki, which translates as ‘little cows’ (how I love that!).  Krówki is a sweet fudge very similar to our Russian fudge, and apparently Russia have a version too.  New Zealand has a strong Polish connection, most famously through our post-World War II Polish refugee children.  Could this explain it?

I won’t keep you all waiting while I trawl through the history of New Zealand confectionary in hope of an answer.  Here is my preferred recipe for Russian fudge.  The best tip I can give you is beat the fudge for as long as it takes in the final stage – it really is important for making it set.

Ingredients:

  • 200g butter
  • 1 can condensed milk
  • 3/4 cup milk
  • 2 Tbspns golden syrup
  • 4 cups sugar
  • 1 tspn vanilla essence

Method:

Place everything except for the vanilla essence into a pot and bring to the boil, stirring constantly.  Once it is boiling, keep stirring and let it boil for about 20 minutes, until a blob of fudge dropped in cold water can be formed into a squishy little ball.

img_8102

Take off the heat, add the vanilla essence, and beat the fudge until it starts to thicken (I’m always into doing things by hand but I can really recommend an electric beater for this bit if you have one!)

Spread into a baking tin and leave to set for at least two hours.

img_8166


Cinnamon & pear muffins

img_0593-jpg

I’m finding myself with a lot of tinned goods recently, not unlike many people in our little shaky isles in the wake of our 7.8 earthquake.  It pays to be prepared.

I’ve heard the comment more than once that tinned pears are the least exciting of the tinned fruits….pale, bland, only good when topped with ice cream.  I had a hunch that this was wrong, but how to prove it?  By coupling tinned pears with brown sugar, butter and cinnamon, that’s how.

img_0596-jpg

I’ve taken my inspiration for the muffin base from Donna Hay’s basic muffin batter.  Which is delicious if you’re on the hunt for a reliable basic muffin, by the way.  I will of course buy a replacement tin of pears for our emergency food stash, but this idea for pear-topped muffins could not wait any longer.  Sunday night requires a sweet little pick-me-up, amiright?

img_0602-jpg

For these you will need (makes 12):

  • 1 cup plain flour
  • 1 cup wholemeal flour
  • 3 teaspoons baking powder
  • 3/4 cup brown sugar
  • 2 teaspoons cinnamon
  • 1/4 teaspoon nutmeg
  • 1 egg, beaten
  • 3/4 cup milk
  • 1/3 cup vegetable oil
  • 2 teaspoons vanilla essence

For the topping:

  • 1 tin of pear quarters, drained and cut into thin slices
  • 1 teaspoon cinnamon
  • 2 tablespoons brown sugar
  • 1 knob of butter, melted

Method:

Preheat the oven to 180 degrees centigrade and grease a 12-cup muffin tin.

Place the dry ingredients into a large bowl and stir to combine.

In a smaller bowl, mix the egg, milk, oil and vanilla essence.  Add this to the dry ingredients and mix only until just combined.

Spoon the batter evenly into the muffin tray cups.  Arrange the sliced pears on the top of the batter.

Combine the topping ingredients and distribute over the top of the pears.

Bake for 25-30 minutes until a skewer comes out clean.

img_0608-jpg


Homemade Hundreds and Thousands biscuits

img_7813

Toddlers and sugar, a match made in heaven?  Probably not for their parents, but when it’s your niece’s third birthday party and you said you’d make biscuits, it’s hardly time to skimp on the sugar.

img_0539-jpg

I was inspired to make these little numbers by one of New Zealand’s favourite cookie treats…the Hundreds and Thousands biscuit.  The name is pretty self-evident, although perhaps not if you hail from elsewhere in the world outside of New Zealand.  ‘Hundreds and Thousands’ is our antipodean name for the rainbow sprinkles on top of these cookies, but other terms include nonpareils and jimmies.

img_7809

I can’t find must history about this biscuit itself, but there are a few stories behind the origins of Hundreds and Thousands.  Some claim they were invented in a New York candy factory in the 1930s, whilst others say that they come from Parisian bakers.

Whatever the origin, it can’t be denied that a liberal sprinkling of on a pink-iced vanilla cookie is an appropriate party treat.  I used Donna Hay’s vanilla snaps recipe for the base and the rest was pretty simple.

Vanilla biscuits:

  • 250g butter
  • 3/4 cup caster sugar
  • 2 t vanilla extract
  • 1 egg yolk
  • 2 & 1/4 cups plain flour, sifted

Icing:

  • 1/3 cup softened butter
  • 1 & 1/2 cup icing sugar
  • Pink food colouring
  • Strawberry essence
  • Hundreds and Thousands / Sprinkles / Jimmies or whatever you call them!

Beat the butter and sugar together until pale and creamy.  And the vanilla extract and egg yolk and beat again.

Finally add the flour and beat until a dough forms.  Wrap the dough in cling film and refrigerate for 30 minutes.


Heat the oven to 180 degrees celsius.  Roll the dough on a lightly floured surface until 3mm thick.

Cut rounds or shapes from the dough and place on baking-paper lined trays.  Bake until just golden – this took ten minutes in my oven.

Cool on racks.  Make the icing by adding the icing sugar to the butter, a drop of colouring and strawberry essence and beating well, using a little hot water to soften as needed.   When cold, ice with pink icing and sprinkle liberally with hundreds and thousands.

img_7819

Edmond’s apple steamed pudding

dpp_0007

Steamed pudding is like a sweet, jammy hug in a bowl.  I love it.  It’s a special favourite in our little country.  I was recently introduced to a New Zealand specialty steamed pudding which is the queen of both steamed puddings and now of my heart…burnt sugar steamed pudding.  Oh wow.  Like hot, soft caramel made into a cake and served with lashings of runny cream.  My mouth waters at the mere memory.

dpp_0002

So, it’s not a surprise that steamed pudding features in that bastion of all that is cooking and kiwi, the Edmonds cook book.  This particular version is jazzed up with a little apple, and all the better for it, as the tart apple partners nicely with the sweet apricot jam and the fluffy sponge.

To make this you will need:

  • 50g butter
  • 1/4 c sugar
  • 1 egg
  • 2 T apricot jam
  • 1 C plain flour
  • 1 t baking powder
  • 1/4 t salt
  • 1/2 t baking soda
  • 1/2 c milk
  • 2 T stewed apple

Cream the butter and sugar until light and fluffy.  Add the egg and beat well.  Stir in the jam.

Sift the flour, baking powder and salt into the butter mixture and fold in.

Dissolve the baking soda in the milk and add to the mixture, along with the apple.

dpp_0001

Grease a 2-cup pudding basin.  Spoon in the sponge mixture and cover the bowl with some greased baking paper.  Secure with string.

dpp_0005

Steam the pudding for half an hour, or until it is springy to the touch.  This took about 45 minutes for pudding.

Serve with cream and a cup of tea!


Chocolate-espresso shortbread

img_6453

I was the happy competitor in a baking competition recently.  I say ‘happy’ because how could you ever not be happy when you have a genuine excuse to make sweet delicious treats several times over?  And the competition was for a great cause too…Good Bitches Baking  and their inaugural Mystery Box Challenge.

img_6447

I was delighted to find coffee and dark chocolate in the mystery box. I would be delighted to happen upon this combination anywhere, granted, but having the opportunity to make two of my favourite things into something even better?  Yippee is all I can say.

When in need of something sweet and decadent, shortbread is never too far from my thoughts.  I’m a self-confessed butter-lover (yes, I did eat it in slabs straight from the block as a child). Shortbread  may as well be a slab of butter that has been baked in an oven.

img_6409

You might think shortbread couldn’t be any better and perhaps, even, should not be messed with.  I’m sympathetic to this. There are few pleasures in life as scrumptious as a some buttery sweet shortbread and a hot drink, or during Christmas, a nip of single malt.

But do give this a go if you enjoy dark chocolate and coffee as much as I do…shortbread provides the perfect backdrop, and this can be whipped up without much bother.  The ground coffee beans add a lovely coffee punch, but leave out or reduce if you want a hint of coffee rather than a cup.

For 10-15 pieces, you will need:

  • 150g softened butter
  • 1/2 cup icing sugar
  • 1/2 cup cornflour
  • 1 cup flour
  • 2 T espresso or strong coffee
  • 60g dark chocolate, chopped
  • 2 T ground coffee beans

Pre-heat the oven to 150 degrees celsius.

Beat the butter and icing sugar together until light and fluffy. Sift the flour and cornflour together into the bowl with the butter and icing sugar mix.  Stir lightly until just combined.

Add the coffee, chocolate and coffee grounds. Use a spoon to combine into the other ingredients until the mixture starts to form a dough.

Turn out onto a floured baking tray and knead lightly.  Spread out into a circle or rectangle (up to you!) – it should be a lovely tan colour, like below.  Cut into bars and prick with a fork.

img_6418


Bake until slightly golden – about twenty minutes.


Chocolate & beetroot brownies

IMG_5146

I know, I know, vegetables and chocolate.  My reflex reaction is ‘blurgh’ too.  But bear with me, these brownies are good, contain lots of dark chocolate and are a handy way to use up beetroot if you find yourself needing to do so.

Not that I often have spare beetroot about the place.  I love the stuff, in line with my enthusiasm for pretty much all vegetables.  The humble beetroot is a member of the Amaranthaceae family and related, would you believe, to chard.  Our modern-day beets descend from the sea beet of the Mediterranean.  Our little beet has an ancient and distinguished history.  Remains of beets have been discovered in illustrious and ancient places, including the third dynasty pyramid Saqqara and the Neolithic site Aartswoud in the Netherlands.

IMG_5113

So naturally we people of the 21st century have found that mashing up beetroot and baking it with chocolate is a delicious, modern usage.  The best tip I can give you about this recipe, as warned in the excellent original from BBC, is to wear gloves and ideally an apron when peeling the beets.  Beetroot has a brilliant red juice, which is a stunning, attractive colour, but will make it look as though you killed someone and it takes some time to scrub off.

You will need:

  •  3-4 medium-sized beetroot
  • 100g unsalted butter and a little extra for the tin; I have done a dairy-free version too, and used 100g dairy-free olive oil spread
  • 200g dark chocolate, chopped
  • 1 tsp vanilla extract
  • 200g caster sugar
  • 3 eggs
  • 100g plain flour
  • 25g cocoa powder
  • Icing sugar for sprinkling over

Set the oven to 180 degrees celsius.  Butter then line a 20 x 30cm tin.

Cover up with rubber gloves and an apron then peel the beetroot and cut it into chunks.  I find it helps to do this bit in the sink, so that you are not left with a pink kitchen.

Place the beetroot in a large microwave-proof bowl and cover with water.  Cover the top of the bowl with cling film, pierce the cling film with a few holes and microwave on high for 12 minutes.

Drain the beetroot then place back in the bowl with the butter, chocolate and vanilla extract.  Use a hand-held, bladed blender to mulch into as liquid-y a mix as you can manage.  You can also do this bit in an electric mixer, although I find my hand-held one works fine as the beetroot is soft and its warmth melts the chocolate.

Crack the eggs into another large bowl and add the caster sugar.  Beat until foamy and pale, about two minutes with an electric beater.  Gently fold in the beetroot mix, then sift in the flour and cocoa.  Mix in the flour and cocoa gently with a metal spoon.  It will be quite pink!

IMG_5132

Pour into the prepared tin and bake for 25 minutes, until the top is all risen.  Cool completely in the tin and once cooled, dust with icing sugar.

This is sweet and chocolatey and honestly, not a hint of beetroot.  It has a very pretty pinkish tinge, not unlike a red velvet cake.

IMG_5156


Sage and cheddar biscuits or, what to do with sage?

IMG_4854

What to do with sage? Make buttery, cheesy sage and cheddar biscuits?  Yes please.

I’ve found myself with a reasonably plentiful supply of fresh sage, which is a new thing.  I have always managed to grow parsley and been left perplexed at how to use the stuff up, but my previous sage attempts have all turned into sad little heaps.

It seems I’m not the only person to pose this question. The lovely Chocolate and Zucchini blog has very helpfully compiled a list of suggestions.  Those of you who have read some of my other cheese-laced ramblings can probably imagine that sage and cheddar biscuits were a stand-out.

IMG_4817

Mmm, cheddar.  Do you know what I love most about cheddar?  It’s those delightful little crunchy bits amongst the dense, savoury cheese.  And recently, I was fascinated to learn  from this wonderful cheese blog, Fromage Homage, that they have a special name….calcium lactate crystals.

IMG_4831

These little biscuits are adapted from this recipe.  They provide a lot of bang for their buck, being so very simple to make but looking most classy served up as a home-made nibble to accompany drinks.  I need to provide you with a warning: they are incredibly buttery.  So much so that you need to have at least two.

Here’s how to make your very own:

Ingredients:

  • 125 grams butter, chilled and diced
  • 125 grams Cheddar  cheese, grated
  • 125 grams flour
  • 1 tablespoon chopped fresh sage
  • Ground black pepper

Preheat your oven to 200 degrees celsius and line two baking trays.

Combine the butter, cheese, flour, sage and pepper in a bowl.  Mix until it forms a ball (I find it easiest to use my hands for this).

Turn the dough out onto a floured surface and roll out to 0.5 cm thickness.  Use a cutter to make into rounds, treating it like a cookie doll by rolling up the offcuts and cutting out more biscuits.

Bake in the oven for 12-15 minutes until crisp and golden.  Cool for one minute and then transfer to a baking rack.

Makes 16 biscuits.
IMG_4842IMG_4849

Welsh cakes for St David’s Day

IMG_4791

I always loved visiting Wales when I lived in the UK, and what’s not to love?  Beautiful countryside, that lovely lilting accent and, most importantly, Welsh cakes.

To the uninitiated, these little morsels may present like just another baked good.  I promise you, they are so much more.  Sugary and dotted with currants, they are gently browned like fat little pancakes on a hot bake tone, which in other words is a whacking great slab of cast iron heated on top of the oven elements.

IMG_4787

The secret to the toothsomeness of Welsh cakes lies not just in the sugar, butter and dried fruit, but in the addition of lard.  Yes, I too felt a little ill when informed of this fact.   But please believe me, it adds a little something wonderful without any taste of fat, leaving the finished product just ever so slightly crisp on the outside, in contrast to the fluffy sweetness inside.

I was very privileged this past weekend to receive one-on-one tuition from a genuine Welsh person, my lovely friend Suze.  Not only did she share her bakestone with me, but also her Nan’s welsh cake recipe.  Very kindly, Suze also hunted out the required lard, seemingly impossible to find outside of a butchers, which arrived in a slightly piggy-scented white tub.

IMG_4764

To learn how to make Welsh cakes a la Suze’s nan, read on…

Ingredients:

  • 225g plain flour
  • 85g caster sugar
  • 1/2 teaspoon baking powder
  • Pinch salt
  • 50g butter and 50g lard, cut into small pieces
  • 50g currants
  • 1 egg, beaten
  • Splash of milk

Tip the flour, baking powder and pinch of salt into a bowl

Add the butter and lard and rub in with your fingers until the mixture looks like fine breadcrumbs.

Mix in the currants, then add the egg and work in together with your hands until you have a soft dough.  If it looks a little dry, add the splash of milk.

Lightly flour your bench top.  At this point, put your bake stone (or heavy-based pan; I am reliably informed it will work just as well) over a moderate heat.

IMG_4769

Roll out the dough to the thickness of your little finger (as demonstrated!).  Use a 8cm cookie cutter to make the cakes.

Add a spot of lard to the bake stone and, once melted, cook the cakes in batches.  They take about 3 minutes each side to become golden brown, crisp and cooked through – you can observe the colour changing as it cooks through along the side of the Welsh cake.

IMG_4784

Sprinkle with caster sugar once cooked.  I cannot emphasis enough how delicious they are served all fresh and warm with a good cup of tea.   Dydd Gwyl Dewi hapus!


A belated Christmas cake

IMG_4234

The busy run-up to Christmas is paved with good intentions, namely my intention to publish this post.  So forgive me for missing the boat a little with this one.  I think we can still consider this timely though, as many of us will have tin-foiled lumps of Christmas cake waiting for a cup of tea.

I would never try to better my go-to Christmas cake recipe – Nigella Lawson’s chocolate fruit cake.  I have made her cake for a least five years and partly what makes it so great is that it’s another of my favourite one-pot recipes.  You don’t need to make it weeks in advance as all of the delicious fruity, boozy, buttery ingredients are gently boiled together to mellow and release their flavours.  Not only does this make it scrumptious, it will also make your house smell amazing.

IMG_4193

So without further ado, here are the ingredients and method below. It’s a long list of ingredients I know, but worth it!  My only little tweak is the brazil nuts, which make the cake feel all hearty and wholesome and slightly good for you.  I also used brandy in my most recent version instead of coffee liqueur, but both are equally good and cointreau’s not bad either.

For Nigella Lawson’s chocolate fruit cake you will need:

  • 3 cups pitted prunes
  • 1 ¾ cups raisins
  • 1 cup currants
  • 50g candied peel
  • 175g soft unsalted butter
  • 1 cup brown or muscovado sugar
  •  cup honey
  • ½ cup tia maria or other coffee liqueur (or brandy or cointreau!)
  • 2 – 3 oranges (juice and zest)
  • 1 teaspoon mixed spice
  • ¼ cup unsweetened cocoa
  • 3 large eggs (beaten)
  • 1 cup all-purpose flour
  • ¾ cup almond meal
  • ½ teaspoon baking powder
  • ½ teaspoon baking soda
  • And if you’re like me, 1 cup brazil nuts

Put the fruit, butter, sugar, honey, booze, orange juice and zest, mixed spice and the cocoa in a big saucepan over a medium heat and bring it to the boil, stirring.  Simmer for 10  minutes and remove from the heat, letting it stand for 30 minutes.

IMG_4196

Meanwhile, warm your oven to 150 degrees celsius and get your cake tin ready.  You are going to line it so the baking paper towers up beyond the sides of the tin and your finished, prepared tin looks like it has an extra top layer of baking paper.

This may seem a lot of faff but I promise it’s worth it as without it, the top of the cake can be burned and tough.  There are more explicit instructions here.  In short, I find it works for me if I grease the whole tin liberally to start.  I cut out a circle of baking paper for the base and two long strips which circle around half of each side, and then plaster it all on, the side pieces first and then the base circle.  This is not the best picture, but I’m including it to give an idea of the finished product if that’s helpful and, like me, the idea of origami makes you balk a little.

IMG_4203

Add the eggs and all dry ingredients to the cooled butter mix and stir gently to combine.  Pour the mix into the prepared cake tin and bake for 1 and 3/4 to 2 hours, until the top is firm but shiny and a skewer inserted into the middle has a little gooey mixture clinging to it.

Cool in the tin.  It keeps for ages wrapped in a layer of baking paper encased in tin foiled. It’s not at all bad with a little nip of something!  And of course, it goes well with tea.

Keep safe and happy this Christmas season, wherever you are in the world.

IMG_4205